> ## Documentation Index
> Fetch the complete documentation index at: https://docs.squire.eu/llms.txt
> Use this file to discover all available pages before exploring further.
# Squire Portal: Manage API Keys and Team Access
> Use the Squire Portal to create and rotate API keys, invite team members, and manage staging and production environments for your EHR integration.
The Squire Portal at [app.squire.eu](https://app.squire.eu) is your central hub for managing everything related to your EHR integration — from API credentials to team roles and usage monitoring. Developers, product managers, and support teams each have a dedicated view tailored to their responsibilities.
## Who uses the Portal
Different roles in your team will use the Portal for different purposes:
* **Developers** — Create and rotate API keys, configure environments, and monitor integration performance.
* **Product managers** — Review usage statistics and user engagement metrics.
* **Support teams** — Manage cases, view logs, and assist with troubleshooting.
## Getting started
Go to [app.squire.eu](https://app.squire.eu) and sign in with your personal credentials.
Navigate to the team settings and invite colleagues by email. Assign each person the role that matches their responsibilities.
If you need additional access levels or have questions about permissions, reach out to Squire support directly from the Portal.
## Managing API keys
API keys authenticate requests from your backend to the Squire API. You use them to obtain short-lived access tokens that initialize the Squire SDK for individual users.
### Navigate to API keys
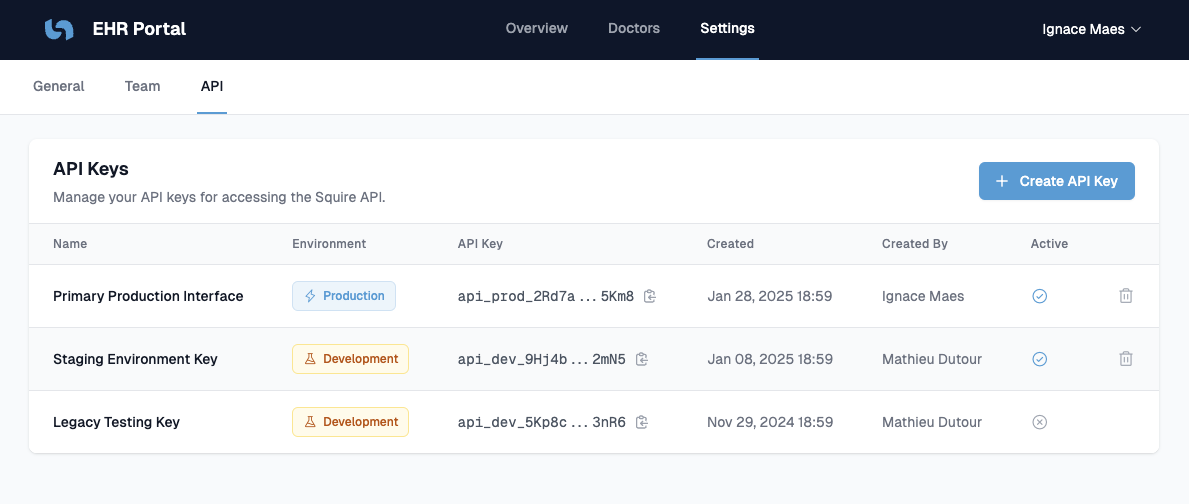
Open the **Settings** section in the Portal and select **API Keys**.
 ### Create a new API key
Click **Create API Key** in the top-right corner and fill in the following:
* **Environment** — Choose the environment this key will authenticate:
* `staging` — For development and testing. Use this key while building your integration.
* `production` — For live users. Switch to this key when you go live.
* **Key name** — An internal label to identify this key within your team (for example, `EHR Backend – Staging`).
Create separate keys for each environment. This lets you test safely in staging without any risk to your production credentials.
### Store your API key securely
Your API key is a private secret. Treat it like a password.
Never expose your API key in client-side code, version control, or logs. It must only be stored and used on your backend server.
Store the key as an environment variable or in a secrets manager (for example, AWS Secrets Manager, Azure Key Vault, or HashiCorp Vault). Reference it in your server code at runtime rather than hardcoding it.
### Rotate a compromised key
If you accidentally expose your API key, act immediately:
Go to **Settings > API Keys** and create a replacement key for the affected environment.
Deploy the new key to your server environment so token requests continue without interruption.
Delete the compromised key from the Portal to cut off any unauthorized access.
Revoking an old key immediately invalidates it. Make sure your backend is using the new key before you delete the old one.
### Create a new API key
Click **Create API Key** in the top-right corner and fill in the following:
* **Environment** — Choose the environment this key will authenticate:
* `staging` — For development and testing. Use this key while building your integration.
* `production` — For live users. Switch to this key when you go live.
* **Key name** — An internal label to identify this key within your team (for example, `EHR Backend – Staging`).
Create separate keys for each environment. This lets you test safely in staging without any risk to your production credentials.
### Store your API key securely
Your API key is a private secret. Treat it like a password.
Never expose your API key in client-side code, version control, or logs. It must only be stored and used on your backend server.
Store the key as an environment variable or in a secrets manager (for example, AWS Secrets Manager, Azure Key Vault, or HashiCorp Vault). Reference it in your server code at runtime rather than hardcoding it.
### Rotate a compromised key
If you accidentally expose your API key, act immediately:
Go to **Settings > API Keys** and create a replacement key for the affected environment.
Deploy the new key to your server environment so token requests continue without interruption.
Delete the compromised key from the Portal to cut off any unauthorized access.
Revoking an old key immediately invalidates it. Make sure your backend is using the new key before you delete the old one.